Scrapbook layout sketches: 10 free sketches for beginners Are you looking for the perfect way to document those cozy Christmas memories? Or maybe you’re staring at a pile of holiday paper scraps wondering how to use them up? This stunning Sketch 1 by Allison Davis for the Hip Kit Club is the answer! It’s whimsical, balanced, and creates the perfect centerpiece for your holiday album. Here’s why we are obsessed with this design: Forget complicated background cut files—the star of this layout is a massive Christmas tree built entirely from horizontal paper strips! Why it works: It is the ultimate way to mix and match patterns. Whether you have 6x6 pads or skinny scraps left over from other pages, you can stack them from wide to narrow to build your tree. Add some texture: The sketch shows dashed lines on every strip—this is your sign to break out the sewing machine and add some messy stitching for that cozy, homemade quilt feel! This layout is designed for those adorable detail shots. It features a trio of smaller photos that don’t overwhelm the design: Left Cluster: A vertical 2.5 \times 3.5-inch photo paired with a 2.5 \times 2.5-inch square. Right Cluster: A solo 2.5 \times 2.5-inch square, tilted just slightly for a playful look. Perfect for: Opening presents, detail shots of your ornaments, or candid smiles. This is the fun part! The sketch mimics a real tree by draping "garlands" across the paper strips. String it up: Use twine or Baker’s Twine to create swags across the tree. Hang your ornaments: Go wild with circular flair buttons, wood veneers, and die-cuts! The sketch shows gingerbread men, stockings, candy canes, and snowflakes. It’s a great excuse to dig into your embellishment stash and use up those little bits and pieces. Go Big: There is a spot for a nice, long script title at the bottom left. It anchors the tree and overlaps the photos beautifully. Tell the Story: Tucked above the left photo cluster are simple journaling strips. It balances the layout and gives you just enough room to jot down the who, what, and where. Ready to add a modern, geometric twist to your holiday scrapbooking? Put down the squares and rectangles, because it is time to embrace the HEXAGON! This eye-catching Sketch 2 by Allison Davis for the Hip Kit Club is all about shapes, layers, and creating a beautiful "honeycomb" of memories. It looks intricate, but with this roadmap, it’s a breeze to put together. Here is the lowdown on this stunning design: The backbone of this layout is a flowing river of hexagons moving from the top left to the bottom right. Mix it Up: The sketch uses a variety of hexagon sizes—some large, some tiny accents, and everything in between. Frames & Solids: Notice the mix of solid paper pieces and open "frames." This is perfect for layering patterned papers without it looking too heavy. Stitch it Up: In true Allison Davis fashion, there are dashed lines around the hexagons. Whether you hand-stitch, machine-stitch, or use a faux-stitch stamp, that texture makes the shapes pop! This layout dares you to crop your photos into shapes! It features two photos cut into hexagons to fit seamlessly into the design grid. Main Photo: A larger 3.5-inch hexagon positioned centrally. Secondary Photo: A smaller 2.75-inch hexagon nestled below the first one. Scrapper’s Tip: If you don't have a hexagon die-cutter, just make a simple cardstock template, trace it over your photo, and cut by hand! One of the coolest features of this sketch is how the embellishments are contained inside the hexagons. It feels organized but festive! Winter Icons: The sketch shows snowflakes and poinsettias centered inside the hexagon frames. This acts almost like a gallery wall or shadow box effect. Tiny Details: Don't forget the tiny solid hexagons scattered around the edges like confetti, and the little flags/banners tucked under the larger shapes for extra dimension. The Title: There is a dynamic "triple-threat" title spot on the right. It combines a script word ("long"), a bold block alpha ("TITLE"), and a subtitle strip underneath. This mix of fonts adds so much energy! The Journaling: No floating text here! The journaling lines are neatly contained inside one of the medium-sized hexagons near the top. It keeps the geometric vibe perfectly intact. 💡 Why we love this sketch: It is a fantastic "scrap buster!" Those medium and small hexagons are the perfect way to use up the last little bits of your favorite holiday paper collection. Are you brave enough to crop your photos into hexagons? Grab your patterned paper and let’s get geometric! 🔷✨ Ready to turn your page into a work of modern art? This stunning geometric Sketch 3 by Allison Davis for the Hip Kit Club uses a repeating pattern of triangles to create an unforgettable background that practically designs itself! If you love graphic, clean lines and big impact, this sketch is your new best friend. Here’s why this mountain of triangles is pure scrapbooking gold: The entire layout is covered in a fantastic, repeating grid of triangles. It instantly creates movement and depth on your page. Pieced Pattern: The larger triangles are created from smaller triangles, making this the perfect place to mix three or four different patterned papers from your collection. Texture Alert: Every major line features that signature dashed stitching—this is essential for defining the shapes and giving the flat paper background a cozy, quilted texture. Small Details: Scattered throughout the background are tiny, subtle embellishments like small hearts and plus signs, filling the negative space within the triangles. Unlike busy multi-photo layouts, this design keeps the focus tight with a single, perfectly matted photo cluster. Size: A vertical $2.5 \times 3.5$ inch photo sits on the left side of the page, framed by stacked layers of paper or cardstock to give it weight. Layering: The photo is layered onto a larger, slightly crooked frame and then stacked on a few tucked-in paper tabs/banners. This adds dimension and helps the photo "pop" off the highly patterned background. The title and journaling are stacked directly below the photo, anchoring the cluster and making it the clear focal point. The Title: A strong combination of a bold, block-lettered "LONG TITLE" layered over a softer script "long title." Mixing fonts like this creates instant visual interest! The Journaling: A tidy journaling spot is created with a bordered tag shape, keeping your notes neat and concise. This spot balances the large photo above it. 💡 Why this sketch is a must-try: It is an amazing way to use up those less-loved papers! By cutting them into small triangles, even the busiest patterns can work together in a cohesive, beautiful way. Ready to start cutting your paper into peaks? Grab your favorite collection and let us know what photos you’re planning to scrap with this striking design! 🔺✂️ Ready for a layout that truly blooms? This gorgeous Sketch 4 by Allison Davis for the Hip Kit Club combines a dramatic floral cascade with a clean, graphic background for a stunning contrast. It’s perfect for capturing garden memories, portraits, or any photo that needs a major dose of femininity and flair! Here’s your breakdown of this beautiful design: The most striking element is the huge, dimensional cluster of flowers dominating the left and top edge. Size & Layering: This isn't just a few flat stickers! The sketch suggests layering die-cut flowers of various sizes and shades to create a rich, dense border that looks like it’s spilling onto the page. Texture: Mixing open-petaled flowers with solid centers, and even adding tiny hearts or dots within the blossoms, helps achieve a tactile, realistic look. The Sweep: The floral cluster follows the diagonal line of the background, directing the viewer's eye right toward the photo cluster. The canvas is divided into large, simple geometric shapes (triangles and quadrants) created by bold diagonal lines. Color Blocking: This is an incredible opportunity for color blocking with paper! Use two or three different solid or subtle patterned papers in the large diagonal sections. Clean Lines: The dashed lines throughout the background sections hint at stitching, which keeps those large geometric shapes feeling intentional and adds a subtle handcrafted touch. The photos are clustered near the center-right, beautifully framed by the surrounding floral and geometric elements. Two Photos: The sketch uses two photos: a square 2.5 \times 2.5 inch photo and a vertical 2.5 \times 3.5 inch photo. Dynamic Placement: The photos are stacked diagonally, with the vertical photo partially covered by the journaling lines and the square photo tucked slightly underneath. This creates dimension and leads the eye. The title is bold and grounded in the bottom right corner, balanced by flying elements. The Title: A powerful block-lettered "TITLE" is paired with a smaller, secondary text strip ("a long title goes here"). This classic combination makes the title stand out against the background. Butterfly Magic: The sketch uses charming butterfly die-cuts flying around the title and photo cluster. This little touch adds movement, airiness, and reinforces the nature theme. Small hearts are also scattered for extra softness. 💡 Why you need to try this sketch: It solves the "blank space" problem! The huge floral border gives you license to go wild with dimension and your most beautiful flower die-cuts, making the layout feel full and lush without being messy. What beautiful photos do you have waiting for this floral frame? Let me know if you plan to try this stunning design! 🦋🌸 Ready for a layout that is visually striking yet incredibly easy to put together? This delightful circle grid Sketch 5 by Allison Davis for the Hip Kit Club uses repeating shapes to create a powerful graphic background that feels both retro and modern! If you have a string of photos from a fun day out or a special celebration, this design is the perfect way to display them. Here is your cheerful breakdown: The entire background is covered in a uniform grid of interlocking circles, giving the layout a fun, polka-dot-meets-modern-art feel. Pattern Variety: Each circle offers a chance to play! Notice the mix of designs: some are solid, some feature a heart, and others are divided in half (the perfect spot for two contrasting patterned papers!). Stitch it Up: As always, the dashed lines suggest machine stitching around each circle. This adds definition and texture, making the background truly pop off the page. The Repetition: The repeating pattern creates beautiful movement and ensures your entire page looks full and balanced. This sketch is designed to maximize your photo count while keeping the look clean and organized. Three Vertical Photos: It accommodates a stack of three horizontal 3.5 \times 2.5 inch photos, one on top of the other. This creates a bold, vertical photo strip. Dynamic Placement: The photo strip is layered slightly crooked and placed over the left side of the circle grid, allowing the patterned background to peek out around the edges. Tucked-In Accents: Notice the small heart die-cuts tucked under the corners of the photos—these tiny details reinforce the theme and add dimension. The title and journaling block anchor the right side of the page, perfectly balancing the vertical photo strip. The Power Duo: The title uses the classic combination of a large, bold "LONG TITLE" paired with a flowing script "long title" above it. This ensures your message gets maximum attention. Subtitle Banner: A small banner tucked underneath the main title provides space for a descriptive "a long title goes here." Journaling Block: A neat, tabbed block with horizontal lines sits right above the title. This clean shape provides designated space for your story without distracting from the photos. 💡 Why you need to try this sketch: It’s a great way to use a punch or a die-cut machine! You can punch out dozens of circles quickly, making the background assembly a speedy and satisfying process. What happy, repetitive moments—like a trip or a fun day—are you ready to scrap on this playful grid? Tell us about your plans! ✂️✨ Ready for a layout that is bursting with fun details and perfectly organized photos? This charming Sketch 6 by Allison Davis for the Hip Kit Club focuses on creating a festive horizontal border of decorative tags and flowers, offering a perfect balance between structure and whimsy. This design is great for documenting small milestones, party snapshots, or any memory that deserves a sweet, layered presentation! The top half of the layout is dedicated to a lush, horizontal arrangement that spans the entire width of the page. Decorative Tags: The background features a row of layered tags in various sizes and decorative shapes (like scallop edges and rounded tops). Each tag has a little bow or twine detail at the top. This is a fantastic place to use up paper scraps! Floral Embellishments: Layered in front of and between the tags is a continuous border of flowers and leaves. This adds dimension, color, and a lush, handmade feel. Journaling/Accents: Small, plain rectangular tags and tabs are tucked into this cluster, suggesting spots for tiny dates, names, or hidden journaling. The layout anchors the design with a clean, horizontal photo strip that sits directly below the decorative border. Three Square Photos: It features three square $3 \times 3$ inch photos arranged side-by-side. This format is perfect for Instagram prints or a sequence of action shots. Layering: The rightmost photo is layered with a simple frame (or mat), making it stand out slightly from the other two and adding a subtle visual break. The area directly below the photos and title is grounded with textural borders. Strip Layers: The photos sit on a few simple horizontal paper strips, which helps define the photo block. Scalloped Border: The bottom layer is a highly decorative scalloped border, which reinforces the playful, celebratory theme of the tags and flowers above. Subtle Stitching: The scalloped edge and the outer edges of the page include dotted lines, suggesting stitching for a complete, finished look. The title is placed directly below the center of the photo strip, creating a strong, horizontal focal point. The Punch: A large, bold, block-lettered "LONG TITLE" stands out, layered over a soft, script subtitle ("long title"). This font contrast ensures the title is unmissable. Small Accents: Small hearts are used as tiny accents around the title and on the tag border, adding touches of love and whimsy. 💡 Why you need to try this sketch: This is a spectacular design for using up your small, pretty embellishments and die-cuts! The tag border gives you license to mix and match all your tiny decorative pieces. What happy memory are you planning to capture with this sweet tag border? Tell us your idea! 🎂💐 Ready to scrap a sequence of events, a fun trip, or any memory that needs lots of photos and lots of movement? This dynamic Sketch 7 by Allison Davis for the Hip Kit Club uses bold arrows and a vertical filmstrip to create a layout that feels like a non-stop adventure! This design is modern, graphic, and perfect for action-packed memories. Here is your breakdown of this high-energy sketch: The entire layout is dominated by strong, stacked chevron arrows that cascade down the center. Movement: The arrows immediately draw the eye down the page, emphasizing movement and direction—perfect for travel or road trip layouts. Layering: The chevrons are built with vertical strips of paper layered on top, creating a dramatic, textured column that acts as the backbone of the design. Subtle Detail: Note the subtle dotted grid background, which adds a light texture without competing with the bold chevrons. This layout is a photo-lover's dream, accommodating at least six photos in two distinct styles! The Filmstrip: A vertical strip holds four small photos, labeled 1 through 4, mimicking a vintage film reel. This is ideal for showing a progression of events. The Main Focus: A vertical $2.5 \times 3.5$ inch photo is angled over the filmstrip, layered with paper tabs to make it the central image. Bonus Photos: Two small, fun photos (one in a square/rounded frame and one in a cute retro TV shape!) are tucked around the title, adding playful detail and boosting the photo count. The title and journaling are grouped at the bottom, stabilizing the busy, arrow-filled center. The Title: A large, block-lettered "LONG TITLE" is layered over the script subtitle "long title." The title sits on a grounded horizontal paper strip. Journaling: A ticket-shaped element with journaling lines is tucked in near the main photo. This reinforces the travel/event theme. The Details: Small arrow and chevron elements are layered around the title cluster, continuing the directional theme right down to the bottom of the page. 💡 Why you need to try this sketch: If you struggle to use a lot of photos on one page, the filmstrip element is your solution! It allows you to display a detailed story sequence without cluttering the main area. Ready to scrap your next big trip or adventure? Which four photos will you put on the filmstrip? 🌍🚀 Ready to bring the outdoors in? This enchanting Sketch 8 by Allison Davis for the Hip Kit Club creates a delightful little flower patch right on your page! Using whimsical stems, layered blossoms, and a charming scalloped "ground," this design is pure scrapbooking magic. This sketch is perfect for spring photos, playground fun, or any moment that blooms with happiness! The bottom section of the layout is built from a horizontal row of overlapping, scalloped circular shapes, creating a charming, undulating "ground" or grassy border. Texture & Depth: These scalloped circles are heavily layered and feature prominent dotted lines, suggesting stitching. This gives the base of the layout a soft, quilt-like texture. Tiny Blossoms: Small, layered flowers with tiny centers are scattered along this scalloped ground, adding intricate detail right at the base. The flowers aren't just die-cuts—they are elevated into tall, whimsical stems that frame the photo cluster. Layered Blossoms: The flower heads are made from layered circles and petals, with some featuring large scalloped borders (like the central top flower) and others having classic daisy shapes. Stems and Leaves: Simple, narrow strips form the stems, and small, layered leaf shapes are attached, extending the organic, garden feel. The photo cluster is nestled slightly off-center, perfectly framed by the tall flower stems. Two Photos: The sketch accommodates a vertical 2.5 \times 3.5 inch photo and a larger vertical 3 \times 4 inch photo. Unique Photo Spot: A particularly fun feature is the main focal photo spot, which is cut into a large, scalloped circle shape right on top of a tall stem! This is ideal for a close-up portrait. The Title: The title is placed right at the base of the photo cluster, sitting on the scalloped ground. It uses the signature combo of a bold "LONG TITLE" layered over a softer script "long title" with a tiny sub-title strip. Journaling Spot: A simple block of horizontal strips sits between the flower stems and above the photo cluster, designated for a brief story. Butterflies: Small, black butterflies float around the top of the design, adding movement and completing the peaceful garden scene. 💡 Why you need to try this sketch: It’s a wonderful way to use your circle punches and dies! You can create all the scalloped ground pieces and the layered flower heads easily with your basic shape tools. Which sweet photo will you place inside that beautiful scalloped circle frame? Tell us your garden plans! 🌼🦋 Ready to master the art of the perfect diagonal? This striking Sketch 9 by Allison Davis for the Hip Kit Club is all about combining bold, structured lines with soft, romantic floral details. The result is a beautifully balanced page that directs the eye straight to your photos! This is a fantastic design for portraits, special occasions, or anytime you want a high-impact background that still feels sweet and pretty. The entire layout is covered in wide, horizontal strips laid at a strong diagonal angle. Color Blocking: This offers a prime opportunity to use four or five different patterned papers or cardstock colors in alternating widths. The variety in the strips adds depth and movement across the page. Defined Lines: The horizontal lines of the strips, angled diagonally, are emphasized with dotted stitching lines, which keeps the background clean and graphic despite the busy patterns. Layered over the center of the diagonal background is a dense, beautiful cluster of flowers and leaves that acts like a semi-wreath, framing the photos. Focal Frame: The flowers cluster around the bottom and right edges of the photo group, leading the eye into the memories. Layering: The sketch suggests layering multiple sizes and shapes of die-cut flowers (daisies, layered blooms, simple sprigs) to create dimension and a rich, realistic look. Butterflies: Small, black butterfly accents are scattered around the wreath, adding a final touch of whimsy and movement. The photos are grouped together in the center-left, beautifully framed by the surrounding elements. Two Photos: The sketch uses a smaller square 2.5 \times 2.5 inch photo and a larger square 3.5 \times 3.5 inch photo. Dimensional Stacking: The photos are layered slightly over each other and positioned right above the main title, making them the immediate focus of the layout. The title and journaling are perfectly placed to anchor the entire central cluster. The Story Block: A block of horizontal strips, representing your journaling lines, is positioned above the photos and slightly to the left. This balances the visual weight of the flowers on the right. The Title: The bold, block-lettered "LONG TITLE" is centered just below the photos, softened by the flowing script "long title" above it. A small banner strip tucked beneath provides space for a subtitle. 💡 Why you need to try this sketch: If you have a favorite paper collection that you want to show off, cutting it into these bold diagonal strips is the best way to feature several patterns on one page! What memory are you ready to frame with this beautiful floral wreath? Tell us your idea! ✂️🌸 Ready for a layout that celebrates the cozy side of crafting? This incredibly clever Sketch 10 by Allison Davis for the Hip Kit Club uses large decorative thread spools as the centerpiece for a page that feels warm, homespun, and stylishly organized. This design is a must-try for documenting sewing, knitting, or any memory connected to making things by hand! The main attraction is a row of five oversized thread spools lined up horizontally across the lower half of the page. Dimensional Pieces: These aren't flat! The spools are cut and layered with string or ribbon wrapped around them, giving them an amazing three-dimensional effect. Alphabet Fun: The title is cleverly integrated onto the spools themselves, with one letter of a word (like "TITLE") placed on each spool. This is an awesome way to use up your large alphabet stickers! Floral Accents: Small flowers and sprigs are nestled between the spools, making the row feel like a cohesive, decorative border rather than just five separate pieces. The entire background is covered in a classic, comforting plaid pattern created by wide, intersecting diagonal lines. Warmth & Texture: The plaid instantly adds a cozy, homespun feel. The sketch features subtle dotted lines along the intersections, suggesting stitching, which enhances the handmade aesthetic. Visual Division: The background lines are broken by a single, solid horizontal strip that runs under the photos and above the spools, perfectly separating the two main elements of the page. The photos are grouped together in the top center, sitting neatly above the spool border. Two Photos: The sketch uses two vertical 3 \times 4 inch photos placed side-by-side. Layering & Tucks: The photos are layered slightly, and various banner strips and tags are tucked into the corners, adding dimension and a spot for tiny dates or sub-titles. Butterflies: Small butterfly accents flutter around the photo corners, adding a touch of lightness to the structured background. The journaling spot is neatly contained on a small block of horizontal strips, tucked right beside the photos on the right side. This keeps the journaling contained and balanced against the visual weight of the photo cluster. 💡 Why you need to try this sketch: This is a perfect theme layout! If you have paper scraps that look like fabric, lace, or textured cloth, this spool design gives you a brilliant reason to use them. What handmade project or cozy tradition will you document with this fun spool design? Tell us your idea! ✂️🧵
Why use scrapbook sketches?
Scrapbook sketches are like blueprints for your layouts. They show you where to place your photos, journaling, and embellishments so everything looks balanced and professional. If you've ever stared at a blank page wondering where to start, sketches are your answer. They save time, reduce stress, and help you create layouts you'll be proud to show off. The best part? You don't need to follow them exactly. Think of these sketches as starting points. Flip them upside down, mirror them, or mix and match elements from different sketches. The creative possibilities are endless, and that's what makes scrapbooking so much fun.
What you'll need to get started
Before you download your free sketches, let's talk about supplies. You don't need fancy equipment to create beautiful scrapbook pages. Start with the basics: cardstock or patterned paper for your background, adhesive to stick everything down, and a few embellishments like stickers or die cuts to add personality to your pages. If you want to make things even easier, consider a subscription to Hip Kit Club. Each month, you'll receive a curated collection of coordinating papers, embellishments, and supplies that work perfectly together. No more wandering the craft store wondering what matches. Everything arrives at your door, ready to use with these sketches.
Your 10 free scrapbook sketch templates
Sketch 1: Rock Around the Scrapbook Tree: A Festive Sketch by Allison Davis!
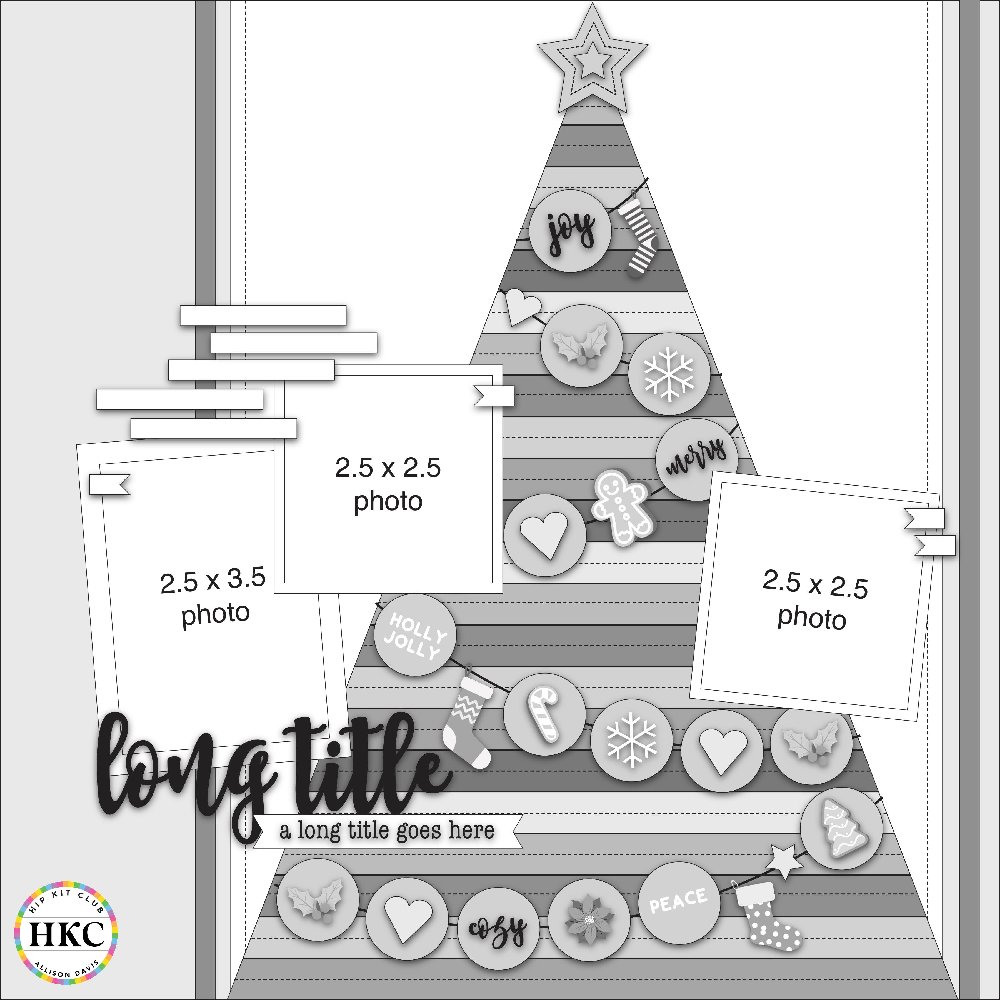
🎄 The Main Event: The "Stash-Buster" Tree
📸 The Photos: Small & Sweet
✨ "Trimming" Your Paper Tree
📝 Title & Journaling
Sketch 2: Hexagon Heaven: A Geometric Holiday Sketch by Allison Davis!
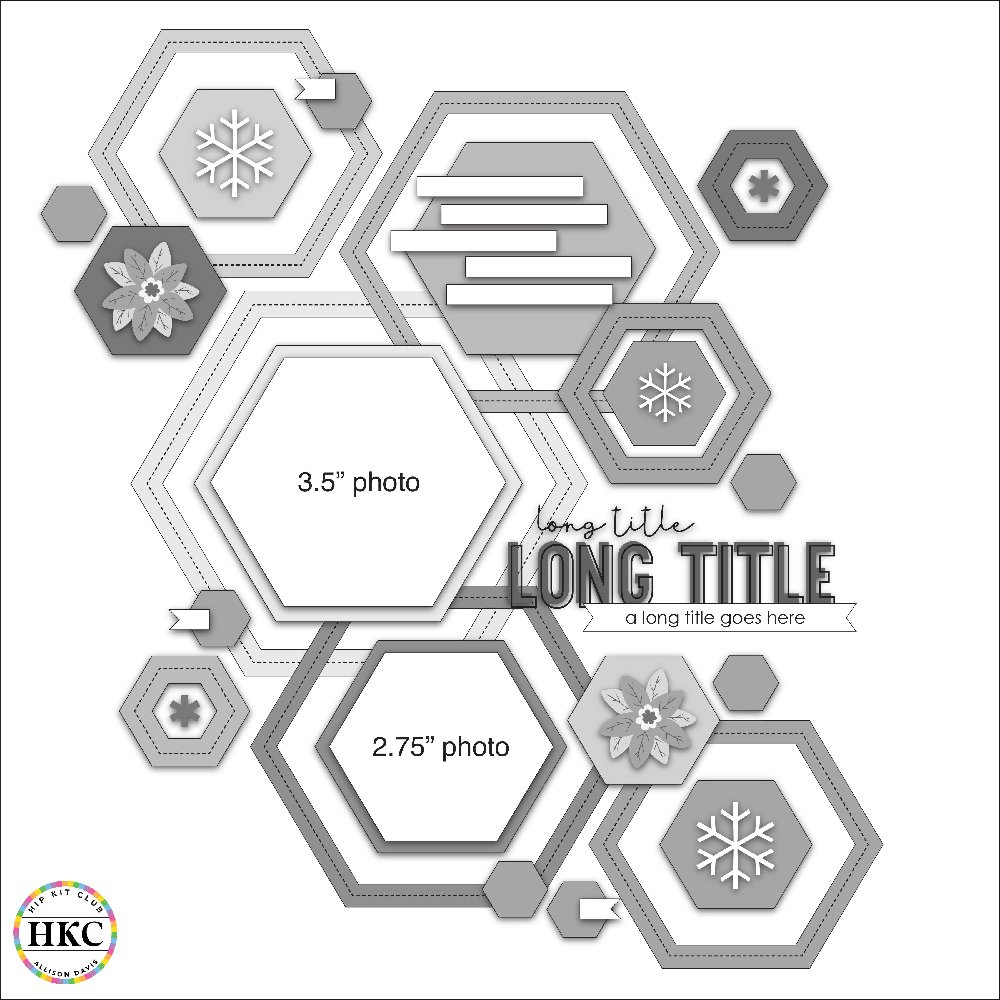
🐝 The Design: A Cascading Honeycomb
✂️ The Photos: Get Your Scissors Ready!
❄️ Embellishment "Pockets"
📝 Title & Journaling
Sketch 3: Peak Perfection: A Bold Triangle Sketch for Maximum Impact!
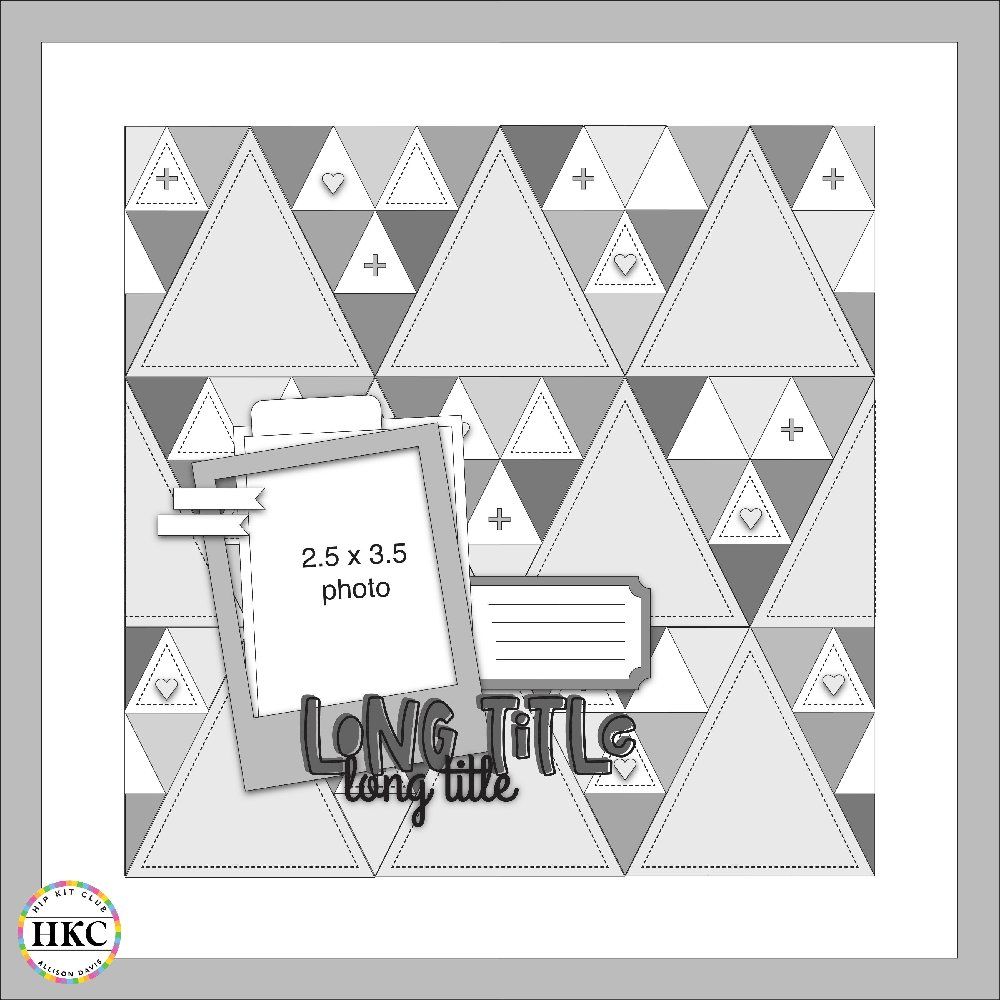
📐 The Background: A Quilted Mountain Range
📸 The Photo: Front and Center Focus
📝 Title & Journaling: Anchoring the Base
Sketch 4: Floral Explosion: A Bold, Beautiful, and Balanced Sketch!
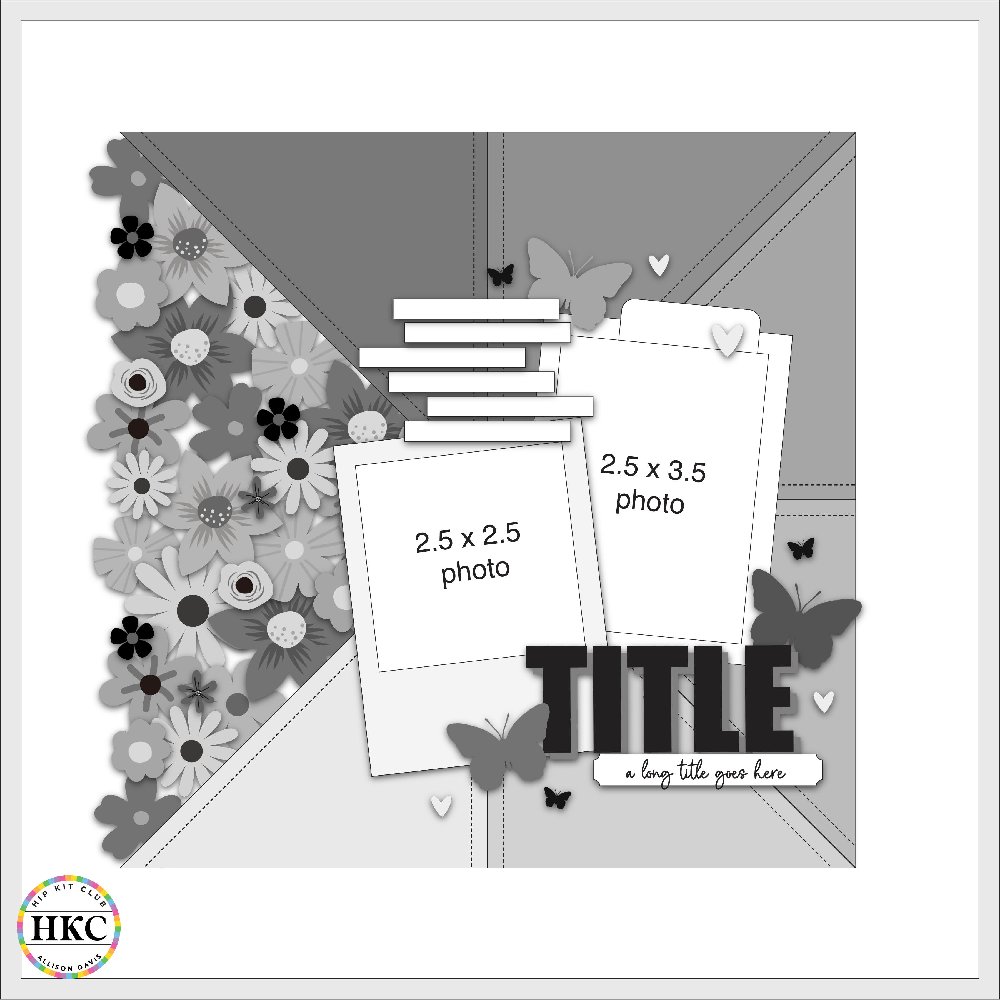
🌺 The Focal Point: The Flower Cascade
🖼️ The Background: Geometric Pop
📸 Photo Cluster: Overlapping Beauty
📝 Title & Accents
Sketch 5: Circular Charm: A Polka Dot Grid Sketch Full of Love!
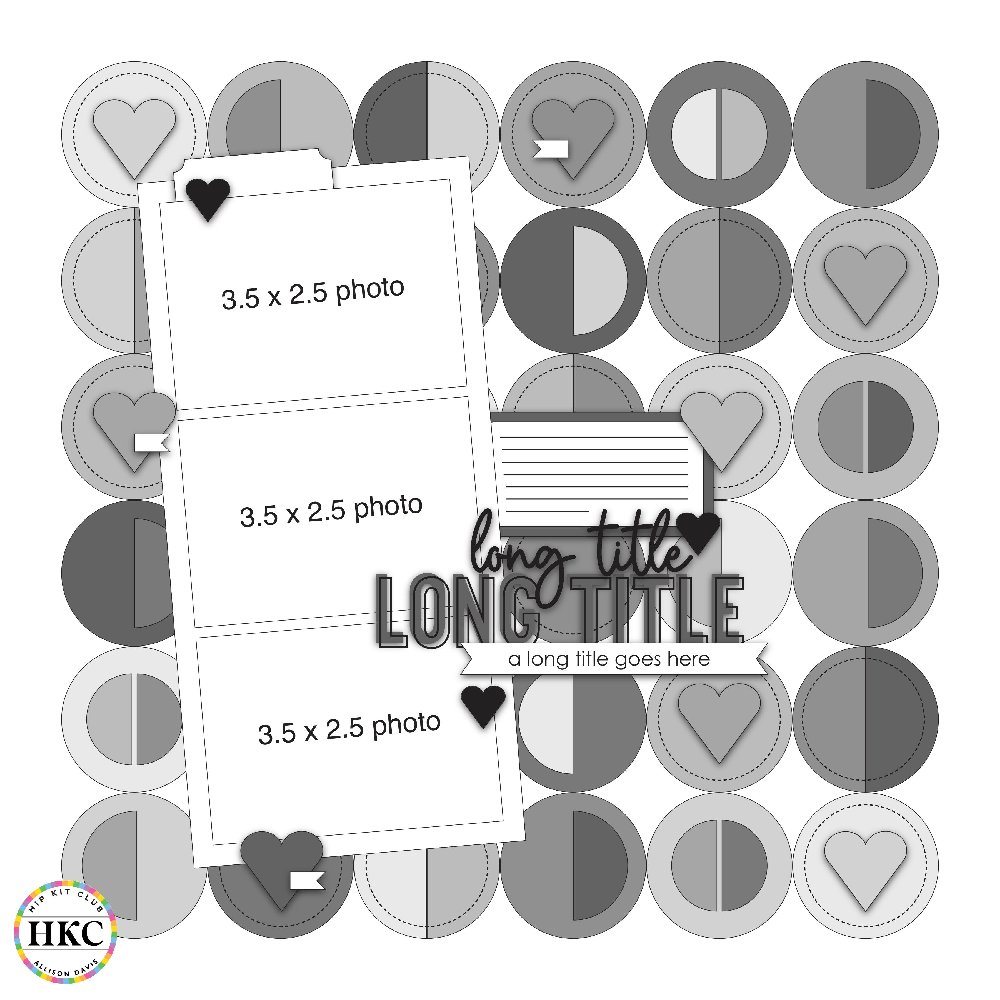
🔴 The Background: A Playful Circle Grid
📸 Photo Strip: Triple the Fun!
💖 Title & Journaling: Centered on the Joy
Sketch 6: Sweet Tags & Photo Grids: A Delightful Celebration Sketch!
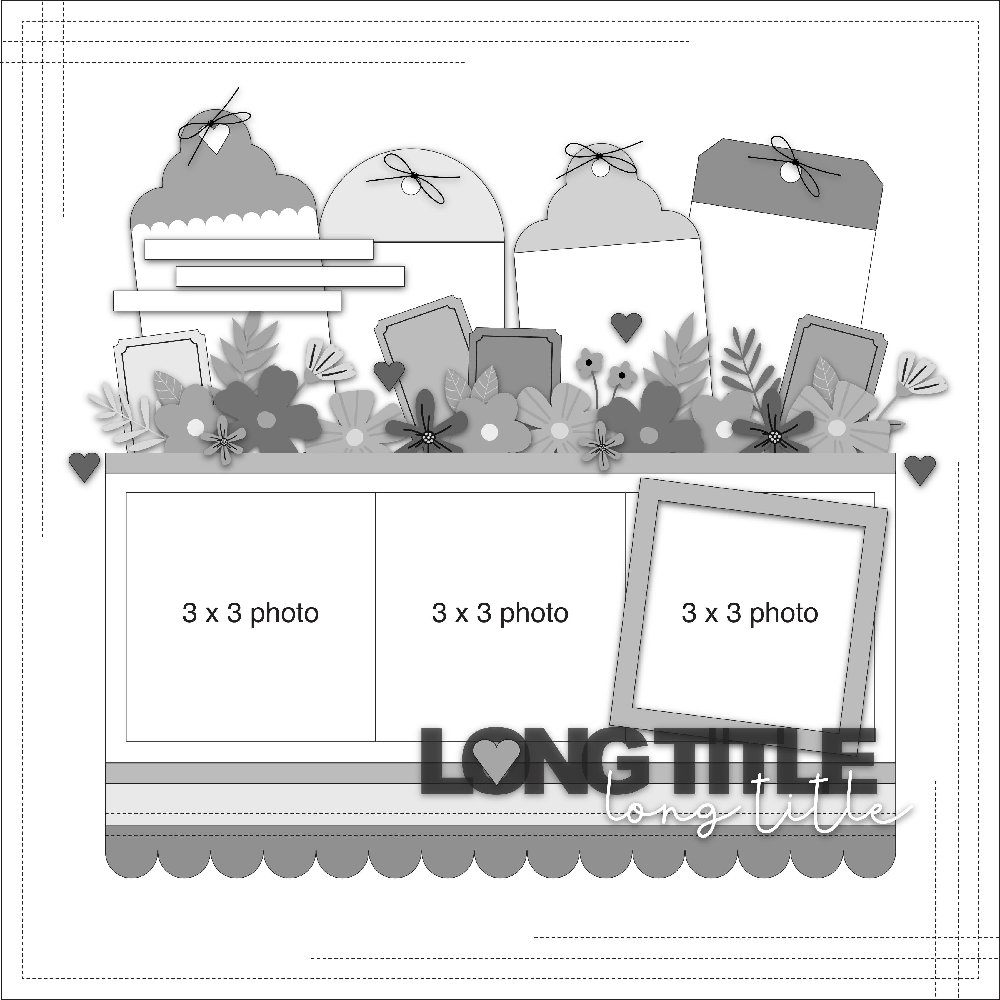
🏷️ The Top Border: A Tag and Flower Party
📸 Photo Strip: The Perfect Trio
🎀 Bottom Details & Grounding
📝 Title: Anchored in the Center
Sketch 7: Adventure Awaits: A Dynamic Chevron & Filmstrip Sketch!
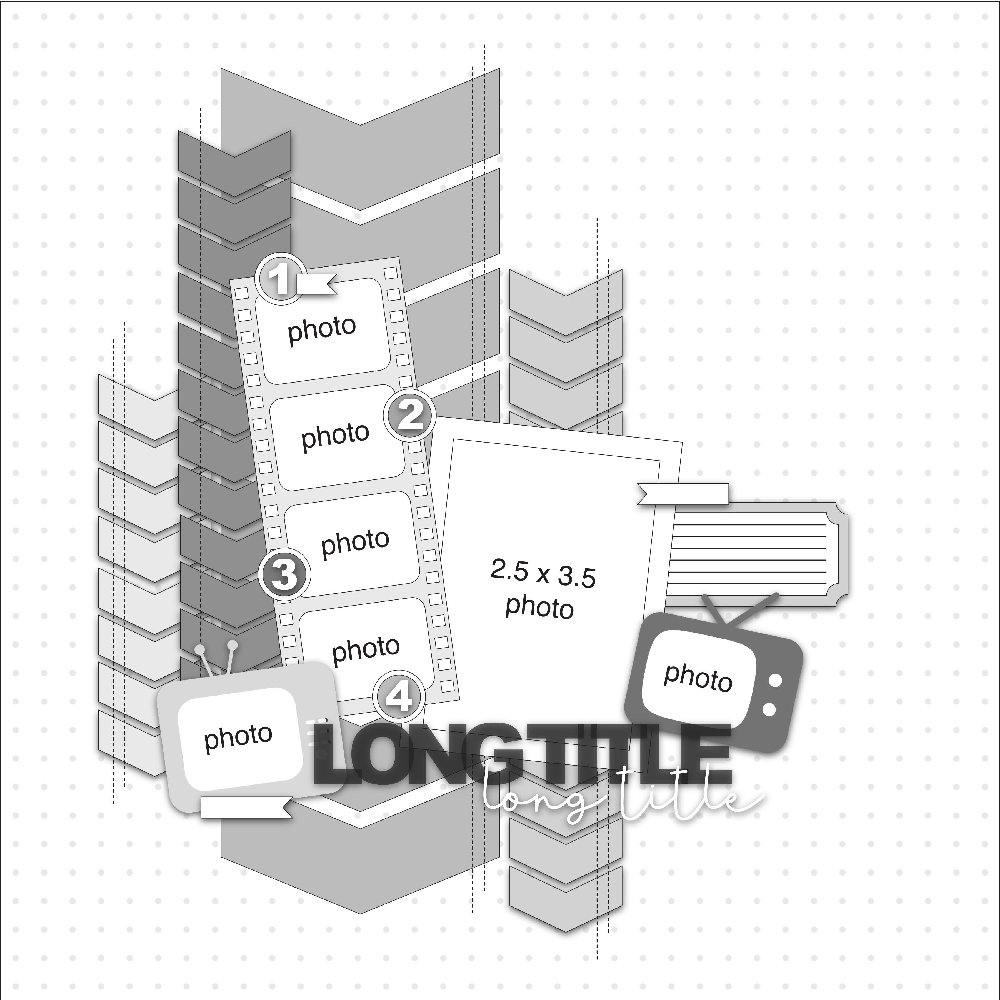
➡️ The Background: The Power of the Chevron
📸 Photo Central: Filmstrip & Focus
🎬 Title & Accents: Storytelling in Motion
Sketch 8: Sweet Flower Patch: A Whimsical Garden Layout Sketch!

🌳 The Foreground: Scalloped Hills
🌸 The Main Elements: Whimsical Flower Stems
📸 Photo Cluster: Framed by the Garden
🦋 Title & Journaling: Floating Details
Sketch 9: Diagonal Drama: A Striped Layout Framed in Flowers!
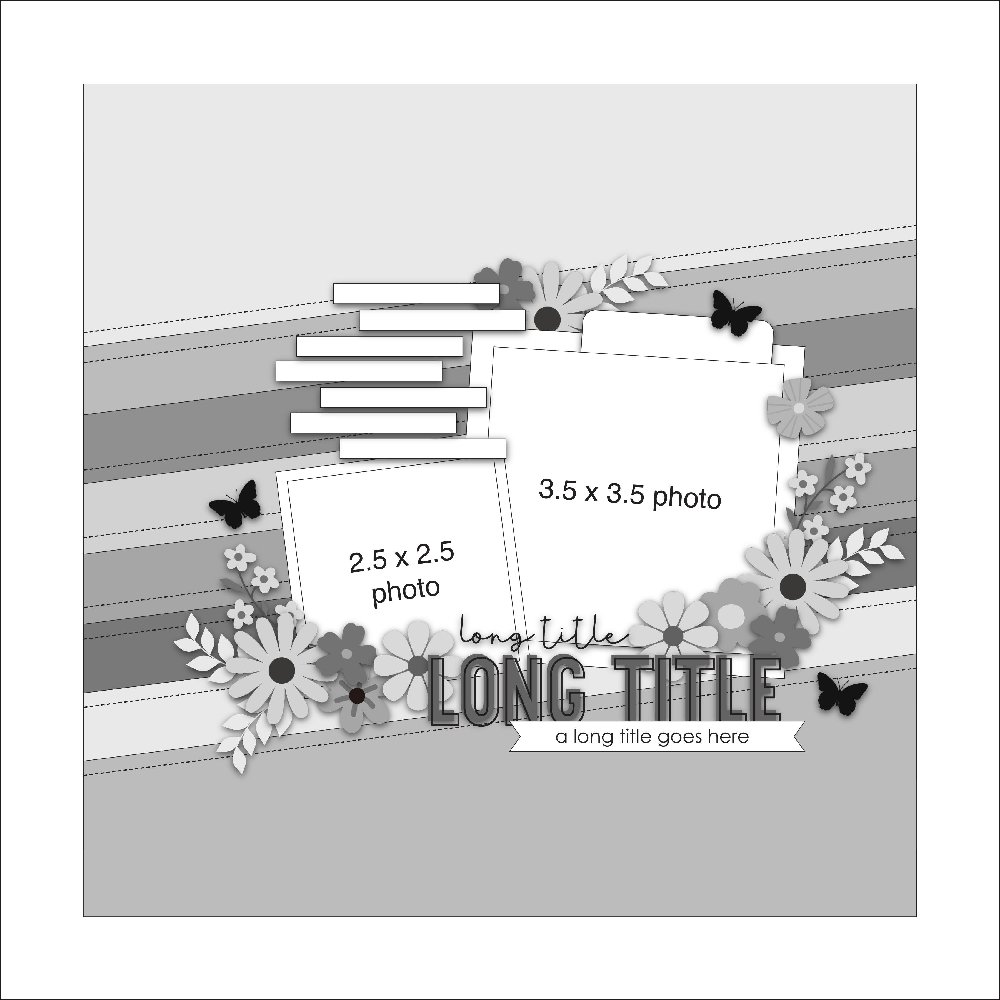
📏 The Background: Diagonal Striped Power
🌺 The Embellishment: The Floral Wreath
📸 Photo Cluster: Tucked-In Focus
📝 Title & Journaling: Anchored Below
Sketch 10: Crafty Chic: A Spool-Tacular Layout Sketch!
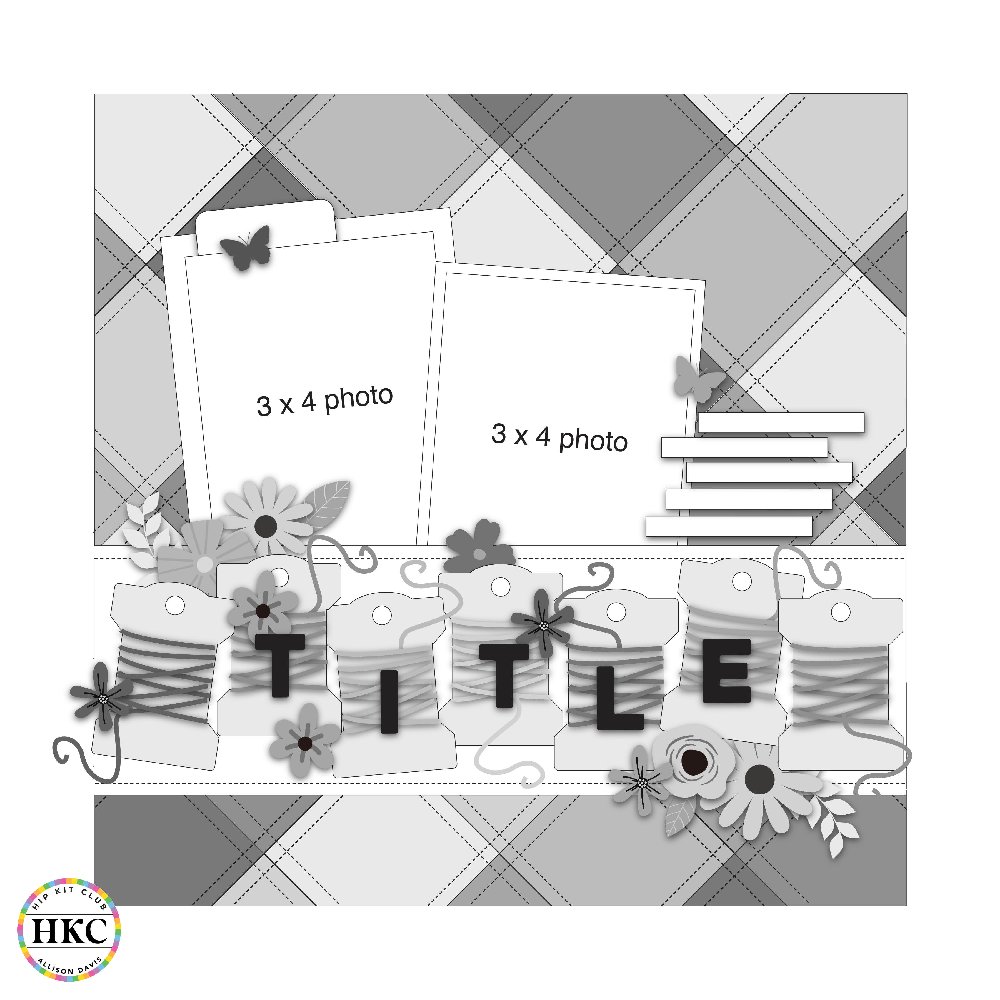
🧶 The Foreground: Spools of Delight
🖼️ The Background: Cozy Plaid
📸 Photo Cluster: Above the Spools
📝 Journaling Spot
Tips for using these free scrapbook layouts
Now that you've got ten amazing scrapbook sketch templates at your fingertips, let's talk about how to make the most of them. First, remember that sketches are guidelines, not rules. If a sketch calls for three photos but you only have two great ones, adjust it. If the title placement doesn't work for your page, move it. The sketches are tools to help you, not boxes to limit you. Second, gather all your supplies before you start. Look at the sketch and think about what papers, photos, and embellishments you'll need. Having everything within reach makes the creative process flow much more smoothly. You won't lose momentum stopping to hunt for that perfect sticker or dig through your paper stash. Third, take your time with placement before you glue anything down. Move elements around until the composition feels right to you. Take a photo with your phone so you remember where everything goes, then adhere your pieces one at a time. This approach prevents costly mistakes and reduces frustration, especially when you're learning.Making sketches work with your supplies
One question beginners often ask is how to make sketches work with the supplies they already own. The good news is that these free scrapbook layouts are incredibly flexible. If a sketch shows patterned paper but you only have cardstock, use cardstock. If it includes die cuts but you only have stickers, use stickers. The specific supplies matter much less than the overall arrangement and balance. That said, having coordinated supplies makes everything easier. This is where a Hip Kit Club subscription really shines. Each monthly kit includes papers, embellishments, and supplies that work beautifully together. You can grab any sketch, pull out your current kit, and know that whatever you choose will coordinate perfectly. No second-guessing your color choices or wondering if that patterned paper clashes with your stickers.Building your confidence
Working with sketches is one of the best ways to build confidence in your scrapbooking abilities. Each time you complete a layout based on a sketch, you're learning principles of design without even realizing it. You're understanding balance, visual weight, white space, and composition through hands-on practice. Start with the simpler sketches and work your way toward the more complex ones. There's no rush. Scrapbooking should be enjoyable, not stressful. If you find yourself frustrated, step away for a bit or switch to an easier sketch. Some days you'll feel like tackling something challenging, and other days you'll want something straightforward. That's completely normal and okay. As you work through these ten sketches, you'll start noticing patterns in what you like. Maybe you're drawn to geometric layouts, or perhaps you prefer designs with lots of layering. Pay attention to what brings you joy, and lean into those preferences. Your personal style will naturally emerge as you gain experience.Beyond the basics
Once you've worked through all ten sketches, challenge yourself to flip them, rotate them, or combine elements from multiple sketches into something new. This is where the real creativity happens. You've learned the fundamentals, and now you can play with them. Consider keeping a scrapbook sketch folder on your computer or phone with screenshots of layouts you love. When you see a magazine page, Pinterest pin, or fellow crafter's layout that catches your eye, save it. You can use these as inspiration alongside your free scrapbook sketch templates, mixing and matching ideas to create something uniquely yours. Don't forget to document your own life while you're having fun with these sketches. The best scrapbook pages tell your story, preserve your memories, and reflect your personality. Use these sketches as the framework, but fill them with your photos, your words, and your creative touches. That's what transforms a pretty page into a meaningful memory keeper.Join the Hip Kit Club community
Ready to take your scrapbooking to the next level? Join Hip Kit Club and receive monthly deliveries of gorgeous, coordinated supplies that work perfectly with these sketches. Each kit is thoughtfully curated to include everything you need for multiple layouts, taking the guesswork out of shopping and giving you more time to create. Plus, when you're part of the Hip Kit Club family, you'll get access to exclusive tutorials, design team inspiration, and a supportive community of crafters who love paper and photos as much as you do. Whether you're just starting out or you've been scrapbooking for years, there's always something new to learn and someone cheering you on.
```